Finally, there is noticeable progress to report! Was sidelined for about a week and a half, since my daughter was sick, and then me. She's feeling much better now, and I'm almost 100% again.
The top cabinets are now all hung. My husband helped me hang the two corner cabinets, and I was able to do the rest. Of course, the suspension rail had to be installed first. Since I did that myself, I figured out a couple tips and tricks to made the job easier (i.e. possible) for one person to do. I'm going to elaborate on these in a separate, future post.
I read a good e-book that a man wrote about redoing his kitchen with IKEA cabinets. He said "For the love of God, don't try installing the top cabinets by yourself." Well, I only partially agree with this. If only my arms were long enough, I could have done it all myself. If my arms were longer, I could have picked up the corner cabinets by myself. My six foot three husband had no problem picking them up, and he said I would have been able to, too, if only I were taller. Take all these insights with a grain of salt, as I pride myself on finding ways to do things independently. I once spent an entire day installing a bottom seal on an MGB windshield. It took about seven hours, but I did it, all by myself.
Drawing the level line for the suspension rail was easy. It was a bit tricky getting the line at the same height on both sides of the kitchen. I don't have a laser level, but I used the window casement as reference points. To install the rail, I tapped small picture hanging nails in along the level line, and rested the rail on those nails while I marked holes to drill into the studs (and between the studs). Cutting the rails to length was a pain, I used an old hacksaw blade with a holder. Don't waste your money buying hacksaw blades from Harbor Freight. They are cheap and absolutely terrible......useless.
After the corner cabinets were up, it was easy to mount the remainder of the top cabinets. It's key to align the mounting hardware on the suspension rail with the holes at the top back of each cabinet. Just lift the cabinet up, catch it on the bolts sticking out of the rail, and then secure it loosely with the mounting plate and nut. I was able to get the cabinets plumb and level with the aid of a few shims. They look pretty good. Pictures to follow. Although the hacksaw blades from Harbor Freight might be useless, the 12 inch ratcheting bar clamps are awesome. Easy to use, non-marring, they made it a breeze to clamp the cabinets together before ganging them.
Today my husband helped me install the microwave. Now that's something I would NOT try by myself. Tricky to get the bottom plate installed. Had to drill two new holes in the factory-provided plate to secure the back plate to the studs with the lag bolts. Also had to shim beind one end of the plate because there was a little "recession" in the wall.
The reason for drilling two new holes was to get below the bottom edge of the "nail plates" that the electrical inspector made me install. Oh well. It JUST worked out. I'm confident the microwave isn't going to fall off the wall. BTW - the IKEA install instructions tell you to drill a 1 and 1/2 inch hole in the bottom of the fan cabinet to pass the plug for the microwave through. You can get away with a 1 and 1/4 inch hole just fine. They also tell you to drill a 3/4 inch hole for the toggle bolts to be used at the each end of the backing plate. You can definitely drill smaller holes than 3/4 inch, but I don't remember what size drill I used just now. I think it was 9/16, but check me on that. I can tell you 3/4 would have been WAY too large of a hole.
The range hood is also up. Just have to hook up the electric. I thought I was going to get a Kenmore hood, but I found a Whirlpool one at Lowes for a great price, and I liked the style of it. Ended up having to make a "channel" in the drywall to run the NM cable over to the entry point for the hood, and I couldn't be happier with the installation. My husband, luckily, was able to assist with placing the range hood, and it was in place in about 10 min.
The floor is also down, It's been down for a while now, letting the wrinkles come out of it. It's fiberglass backed sheet vinyl. I'm not too happy with the color. It's seems much darker than the sample we looked at at Home Depot. But since we had such a difficult time picking out a floor, we're thinking that maybe it's too dark for a reason.......because the other floor would have been way too light. The floor does look pretty good, despite the difference in color.
It did take FOREVER to patch the underlayment. I used ring nails, and each one had to have patch applied to it. I also had to place a jack post in the crawl space to support one joist that was sagging. Pretty proud of the result I got. Now when you walk in the kitchen, the floor is level, and you don't fall down into a hole.
So that's it. Sorry no pictures in this post. Next tasks are to install the under cabinet lighting, the window trim, and the shelves on either side of the windows.
Sunday, July 29, 2012
Friday, June 22, 2012
Overdue Update - Rough Inspections Passed!
Have been busy again, here.
My dad was here on Monday when the inspectors came. The plumbing and pre-drywall passed no problem. Just a reminder to put some supports on the drain pipe. The rough electric was a bit sketchy - have to use tamper resistant outlets (OK), and need to install a plug for the dishwasher (OK), and also had to put metal plating over the horizontal runs of wire in the walls. This is apparently to satisfy NEC 300.4(A), but the logic is flawed, if you ask me. Now I understand what all the people on the DIY forums were talking about. Interpretation of the code is to the discretion of the local inspector, and this one determined that the front of the drywall is a nailing surface. Most inspectors (and the 2 retired electricians I talked to at Home Depot) only consider the front face of the stud/furring strip to be a nailing surface, and require nail plates only in those areas.
Luckily, my dad worked in a machine shop for a LONG time, and he is one with sheet metal. He suggested we get some metal plates and he cut them into 1 and 1/4 inch strips to place over the horizontal runs of wire. So that got taken care of.
He lent me his chop saw and showed me how to use it. We cut 1x3's into short pieces to make blocking for the suspension rail of the top cabinets. Drilled into the boards and then attached them between the furring strips with 2 inch masonary nails. Hammering masonary nails is not fun, but that is done.
I also put up some 3/4 inch expanded polystyrene foam (EPS) board insulation between the furring strips. This took some time, to trim it and fill in gaps, etc. - and clean up the little pellets of styrofoam that flaked off everywhere.
Today I finally got the old vent out of the wall. It was actually falling off. The only thing holding it in place was caulk. It was destined to come off, and I can't believe rain wasn't leaking in around it.
I mixed up a bit of mortar, and filled in the hole with bricks. The bricks I got were a 1/4 inch smaller than the ones on the house, but I'm tired of running to the store, so I used the short bricks. This means you can really see where the patch is, but I don't care. Sometime down the road, we can hire a mason to come in and make it look just like the rest of the house. I never did brick work like this before, and I think it came out really good for a first project. Pictures are below.
Now I can get into putting up the vapor barrier and start drywalling.
 |
| Here's the patch from the outside. I think the new bricks are set back from the others a bit, but I'm not going to be concerned about it. I have to get out there and wire-brush the morter on the brick faces before it hardens too much. Also put up some pastic because it's going to pour rain in a little while. |
 |
| These are the nail plates. You can see the vent sticking through the wall. |
 |
| The dishwasher outlet box is at the bottom under the right side of the window. You can see some blocking on the top of the wall. All the insulation is in place. |
 |
| This is the partition wall. The are some nail plates here. Also can see the blocking at the top of the exterior wall. |
 |
| This is the back exterior wall. The vent is gone. You can see the blocking at the top of the wall. Now I just have to refit the insulation and I can put up the vapor barrier. Also have to note where the centers of the furring strips are (and the wires) for future reference. |
Saturday, June 9, 2012
Gallery of Electric "Wonders"
Because they make you wonder, in alot of ways.........
I'll try to group them by the room in which I found them.
Kitchen
 |
| Cut wires under the dishwasher. |
 |
| Better view of cut wires under dishwasher. |
 |
| Melted insulation on GFCI in kitchen. |
 |
| Box for the GFCI shown above. Isn't this box a bit small for a GFCI? |
 |
| Connection for old exhaust fan is not secured. Tape only, no wire nuts, and no connector at the hole in the top of the box frame. And that metal is sharp. |
 |
| Sheath for the old fluorescent light is way over stripped. |
 |
| Tap light without a box. |
 |
| Same tap light pulled out of the wall. These are push-connection only, and have no ground terminal. This switch controllecd the exhaust fan. |
 |
| Going back to the dishwasher - the connector for the box was not screwed in at all. It was just placed there. |
 |
| Crowded box under the old cooktop. Gas line is seen at the top of the picture. This outlet was being used as junction for three sets of wires, and the box was not secured well to the back cabinet wall. |
 |
| Same box seen above (under the cooktop). There are no conectors of any kind for the wires entering the box. |
Crawlspace
 |
| The circle. This should have at least been in a box. This was the connection between the supply line, the line to the exhaust fan, and the line to the switch controlling the fan. Not really the way to do things. |
 |
| The circle, dissected. There were no wire nuts. |
 |
| This isn't the right connector for NM cable. |
This is where I've been lately........
If you're wondering why I haven't posted in a few days, this should answer your question!
I've been busy. I really wanted to salvage the walls, but the plaster thickness was not uniform on the walls where the cabinets would go. My Dad convinced me that it would be best to rip out those walls and put in new drywall, as the plan was to rip out all the walls in the first place.
So yesterday I just resigned myself to the fact that the walls had to come out, and got out most of them. The little oscillating multifunction tool I got at Harbor Freight worked really well at cutting out the old plaster and backing board along where I'll seam the new drywall with the old walls. Only thing is the blade is dull already, so I have to get a new one to clean up a few seams.
The joint between the wall and ceiling is finished with that wire mesh "tape" and it's going to be a real pain to try to cut that out neatly. I have to measure the walls to see what's going on, but if the top panel of plaster is going to end just above the top of the new cabinets, I might just leave the old plaster on the wall and put a seam there. No one will see it. If I'm lucky, then I won't have to deal with that mesh wire stuff at the ceiling.
Also had to deal with more electrical "wonders" to disconnect the final GFCI in the kitchen. Maybe I'll start my gallery of electrical issues today.
 |
| This is where I will seam the wall behind the fridge. |
 |
| This is the seam for the wall beneath the left corner of the back window. This window goes all the way to the ceiling, so I will only have to finish the drywall joint in this area. |
 |
| Better view of the back wall with the plaster removed. I'm hoping that the bottom of the top panel is high enough that it will end just above the top of the new cabinets. If so, then I can just drywall in what's below and not have to deal with all that wire stuff at the ceiling joint. |
 |
| Wall where the sink was, with the plaster removed. |
 |
| A badly cut 1x3 on the right of the old vent opening. I don't know if this will be OK with the inspector. Maybe this weekend we'll have some nice weather and I can get outside on the ladder to remove the old vent and patch the bricks on the outside of the house. |
 |
| A damaged 2x4 in the partition wall. I didn't do it! This is another thing that I'm worried the building inspector will be concerned with. The onlything I can do to fix this would be to place another 2x4 next to it. And I'm only doing that if the insepctor makes me. The vent for the kitchen sink runs up through this wall. You can see where it did leak in the past. I'm hoping for a good rain to make sure it's not leaking anymore, and I don't think it is. Our friend just placed a rubber boot over the outlet for this vent on the roof in the fall. Our home inspector saw no signs of leaks. I'm not surprised. |
Friday, June 1, 2012
Lots of Good Things Happened Today!
So much happened today. More than I thought would get accomplished. After fretting about the dishwasher shut off valve, I found my PB Blast and squirted some of that on. Then got some channel lock pliers and was able to shut it off. YAY! And so, after some more disconnections, was able to get the dishwasher out. I had to get it over two layers of flooring to slide it out. It was sort of "flooring locked". There were some electrical issues encountered with the dishwasher, but I'm saving them for the gallery of electrical code violations (separate LONG future post).
With the dishwasher removed, I was able to break my way into the sealed-off corner area. The "sweet" storage area in any kitchen, and both corners were walled off in this kitchen. Not anymore. The only thing to have entered the forbidden zone was a poor little mouse, which was actually not gross to find as I had feared it would be. It was sort of cute.


The next big surprise was that the tile pretty much fell off the walls. Only a tap with a chisel and a hammer and it came right off. Hardly any damage to the walls themselves, and I'm pretty sure they can be repaired instead of replaced. This will be a huge time saver. I plan on removing any loose material and then skim-coating the wall surface to make it smooth again.


Another big relief was to find that the current layer of flooring is only held down with a few teeny-tiny staples, and it peels up very easily. The layer below it, though, might be a bit more difficult to remove.
Late in the afternoon I went on a massive Home Depot plumbing run. The man in the plumbing section is a retired plumber and he kind of knows me now. I gave him the list, and within 20 minutes he had everything pulled together, and even gave me a couple alternative (and much better) ways to do things, and a few how-to lessons.
In the evening, our friend stopped by to address the gas line situation. He had to remove a few base cabinets and part of the counter to trace the lines. Wouldn't you know, the only way to shut off gas to the cooktop and the oven is to shut off the gas at the meter? Can I tell you how not safe this was? I cannot believe this got passed the inspectors who signed off on the occupancy permit when we bought the house. The requirement there must be a shutoff for EACH gas appliance within 6 feet of the appliance in the same room in which the appliance is located. No worries, because this will be fixed before the new stove goes in. These pictures show what it looked like when our friend got donw working tonight around 10:30.

We also did some work in the crawlspace, adding shut offs for the supply lines to the kitchen sink (there weren't any in the crawl space, just under the sink), and capping off the drain line for the dishwasher. Here's what the drain for the dishwasher used to look like:
 And now I'm really tired, and I'm going to bed. The next thing to do is to break down the cabinets our friend removed and then I can tackle getting out the remaining base cabinets, and exploring the possiblility of salvaging the remaining walls. Can't do any more work until Monday.......
With the dishwasher removed, I was able to break my way into the sealed-off corner area. The "sweet" storage area in any kitchen, and both corners were walled off in this kitchen. Not anymore. The only thing to have entered the forbidden zone was a poor little mouse, which was actually not gross to find as I had feared it would be. It was sort of cute.


Another big relief was to find that the current layer of flooring is only held down with a few teeny-tiny staples, and it peels up very easily. The layer below it, though, might be a bit more difficult to remove.
Late in the afternoon I went on a massive Home Depot plumbing run. The man in the plumbing section is a retired plumber and he kind of knows me now. I gave him the list, and within 20 minutes he had everything pulled together, and even gave me a couple alternative (and much better) ways to do things, and a few how-to lessons.
In the evening, our friend stopped by to address the gas line situation. He had to remove a few base cabinets and part of the counter to trace the lines. Wouldn't you know, the only way to shut off gas to the cooktop and the oven is to shut off the gas at the meter? Can I tell you how not safe this was? I cannot believe this got passed the inspectors who signed off on the occupancy permit when we bought the house. The requirement there must be a shutoff for EACH gas appliance within 6 feet of the appliance in the same room in which the appliance is located. No worries, because this will be fixed before the new stove goes in. These pictures show what it looked like when our friend got donw working tonight around 10:30.
 |
| Gas lines in the wall. The shut off on the left was added so we could turn the gas back on. The shut off on the right, for the wall oven, was there, but the only way to access it was to remove the wall oven, but you couldn't remove the wall oven without shutting off the gas because there was a gas pipe sticking down from the regulator on the oven which blocked the oven from being slid out of the cabinet (if that makes any sense). I don't even know why they bothered putting the shutoff back there, because you couldn't use it anyway. |


We also did some work in the crawlspace, adding shut offs for the supply lines to the kitchen sink (there weren't any in the crawl space, just under the sink), and capping off the drain line for the dishwasher. Here's what the drain for the dishwasher used to look like:

Thursday, May 31, 2012
Slowly but Surely
Not too much (visible) progress today. Late start for daughter's dr's appt, and all is well there.
I started doing some electrical, to uncouple the kitchen from the laundry, etc. Surprise! The supply line from the panel runs directly to an outlet in the kitchen, and from there to a box in the crawl space (seriously, only 2 feet below the outlet box - they should have run the line to the box in the crawl space FIRST, and THEN up to the outlet). In the box, the supply is split to other items in the kitchen, outlets in the great room, and the laundry. The circuit continues through the laundry to power some outside lights. Really. It's overloaded.
So, since I can't pull wire alone, I just ended up removing the first outlet in the kitchen, splicing the wires together so that the great room/laundry will still have power. I was able to isolate and remove the lines for the kitchen exhaust fan, though, so there was some progress made. A new wire needs to be pulled from the panel directly to the laundry to solve the problem, and this will be done eventually. Luckily, we met a really nice guy when we lived at our old place who became a good friend and has agreed to help us out when we need it. He's going to be our "safety net" of sorts. Definitely will need his help in pulling new wires over from the panel.
Had to run to buy a few small electic items (blanking plate and knock-out plug) - and also got a really nice pry bar to start working on ripping out the walls.
I was able to remove the soffit and wall cabinets on the exterior wall. Need to address the gas supply line and remove the oven/cooktop tomorrow. The hot supply to the dishwasher is frozen open, so I sprayed some WD-40 on it and will try again tomorrow. Wish I could find my PB Blast.......
Unfortunately found out that the backsplash was over-engineered. There was some 1/4 inch plywood GLUED to the plasterboard. And then there was some veneer GLUED to the plywood (with troweled on mastic in both layers). Honestly. Wouldn't it have been easier to NAIL the plywood to the wall and then use adhesive to secure the veneer? I don't get it. They must really have liked the backsplash, becuase the only way to get that out is going to destroy the walls. Luckily, I planned on removing the walls to install insulation. Otherwise, this would have been an unsettling shock.
The wall cabinets were secured to the wall with a grand total of TWO screws on top, and TWO on the bottom. The backsplash was more secured to the wall than the cabinets. As was the soffit. The orginal color of the cabinets was a nice birch color.
There was at least some progress today. I was able to rip out some of the old electircal, and remove some more cabinets. Found out about the dishwasher valve, and also about the routing of the "tangled" electric circuit. I'm inspired to start an electrical code violation gallery.
Tomorrow I'm going to try to get the dishwasher out, and probably start ripping out walls. Also need to go on a Home Depot run to pick up some electrical and plumbing supplies.
 |
Mixer Box Trick. Here's how I used the mixer box to support the top cabinets while removing them. This cabinet had one screw on the top, and one screw on the bottom. It was secured to the cabinet to it's right, which has already been removed. The original color of the cabinets can be seen. |
Wednesday, May 30, 2012
First Day of Demolition
Finally!
Got to start ripping some stuff out. It's been nuts here. Project was delayed for permits, and then it was my daughter's birthday, so in retrospect, it's probably a good thing the permits hung up getting started, so the kitchen was intact for her birthday party.
Only got to work about 3 hours in the kitchen today, since aforementioned daughter was sent home with a rash from daycare today. Dr's appt tomorrow morning, but I'm sure she is fine, nonetheless.
Also got to take some pictures.
 |
| Original view of the interior wall. The fridge is shown on the left. |
 |
| Interior wall with the cabinets removed. There were only 5 screws holding these cabinets onto the wall - 3 on top, and 2 on the bottom. I was able to use my KitenAid stand mixer box to support the cabinets while I was removing them. I had to break them down completely and carry them out in pieces to the dumpster. The soffit above the cabinets was made of thin hardboard and was very easy to remove. You couldn't tell it was only hardboard by looking at it. It looked pretty good. |
 |
| Screw and finish washer used to hold cabinets onto wall. That's my left thumb, to provide perspective. The screws were anchored into the 2x4's of the wall. |
 |
| Original sink wall. |
 |
| Sink wall with doors removed. |
 |
| The sink. It's so small! New sink will be a double basin with a nice high pull-out faucet and built-in soap dispenser. I can't wait. |
 |
Under the sink. Evidence of some
major leaks in the past. The drain pipe was
new just before we bought the house.
|
 |
| Original exterior corner. The wall oven is too narrow. |
 |
| Exterior corner with doors removed. |
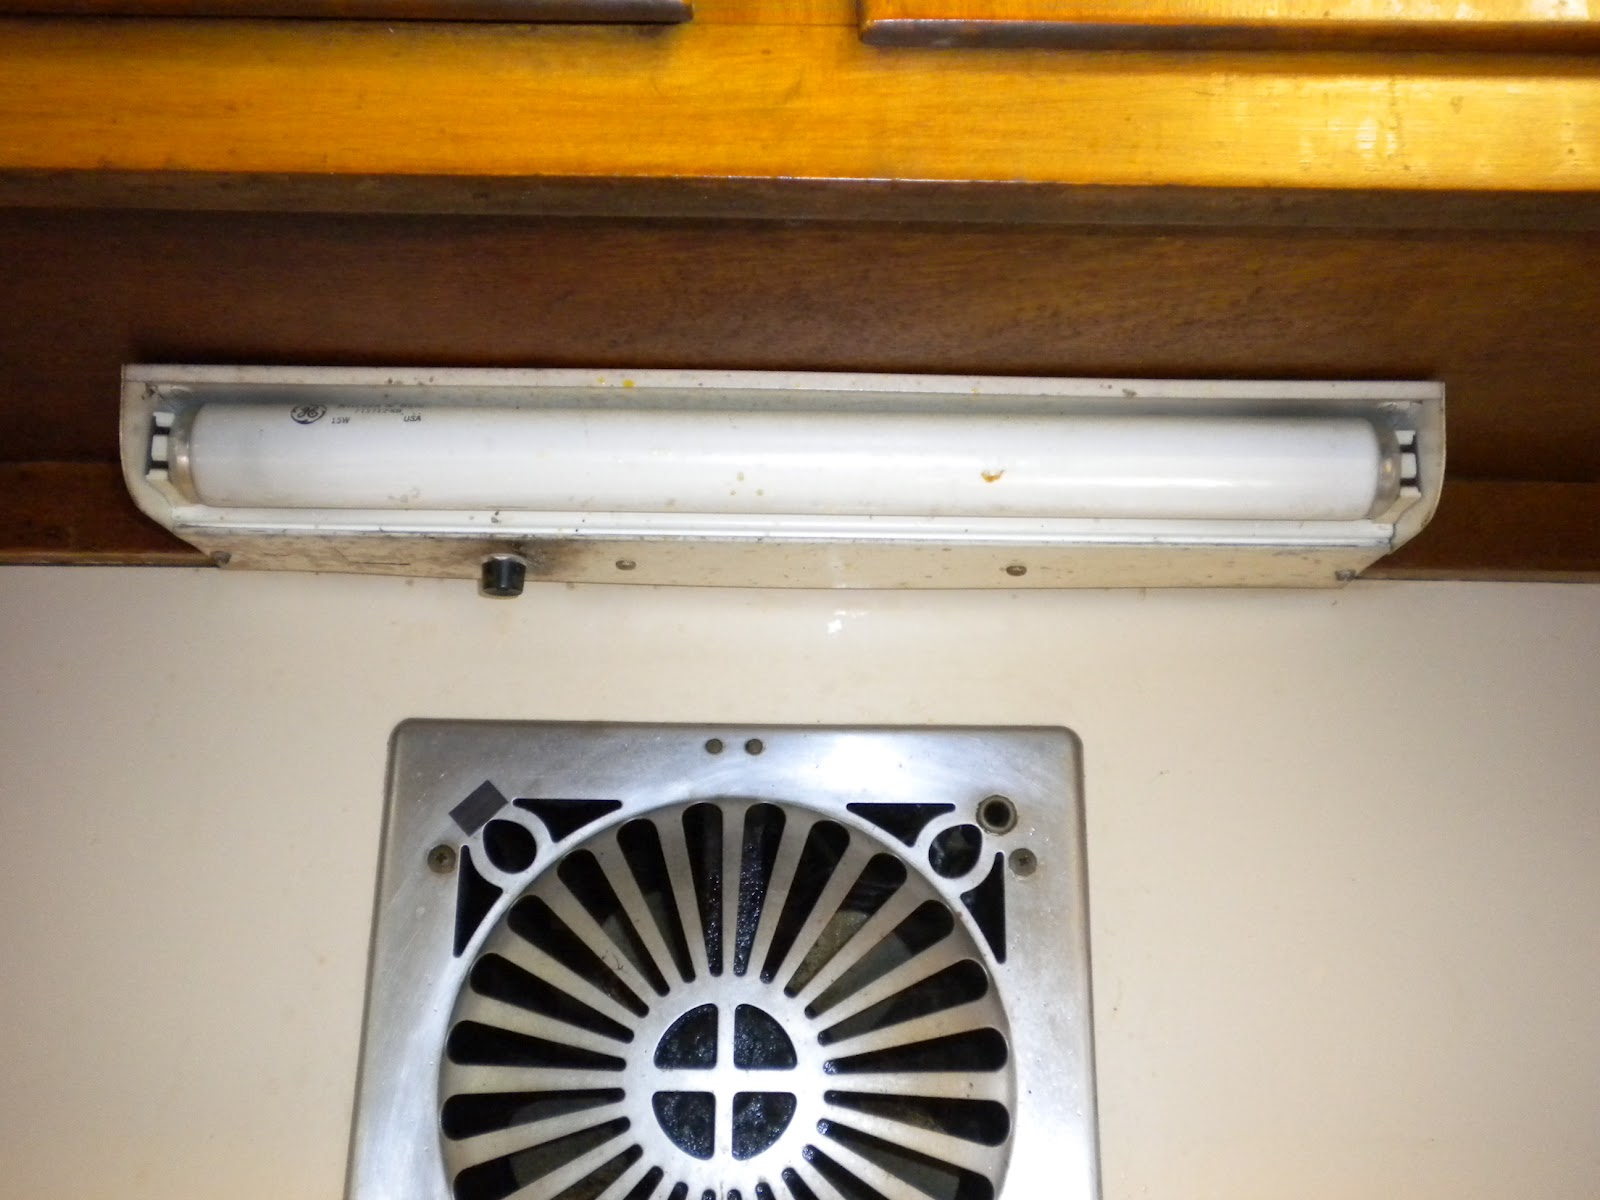 |
| Exhaust fan and fluorescent light above cooktop. The louvres on the fan don't close anymore because of all the grease. It's getting ripped out. |
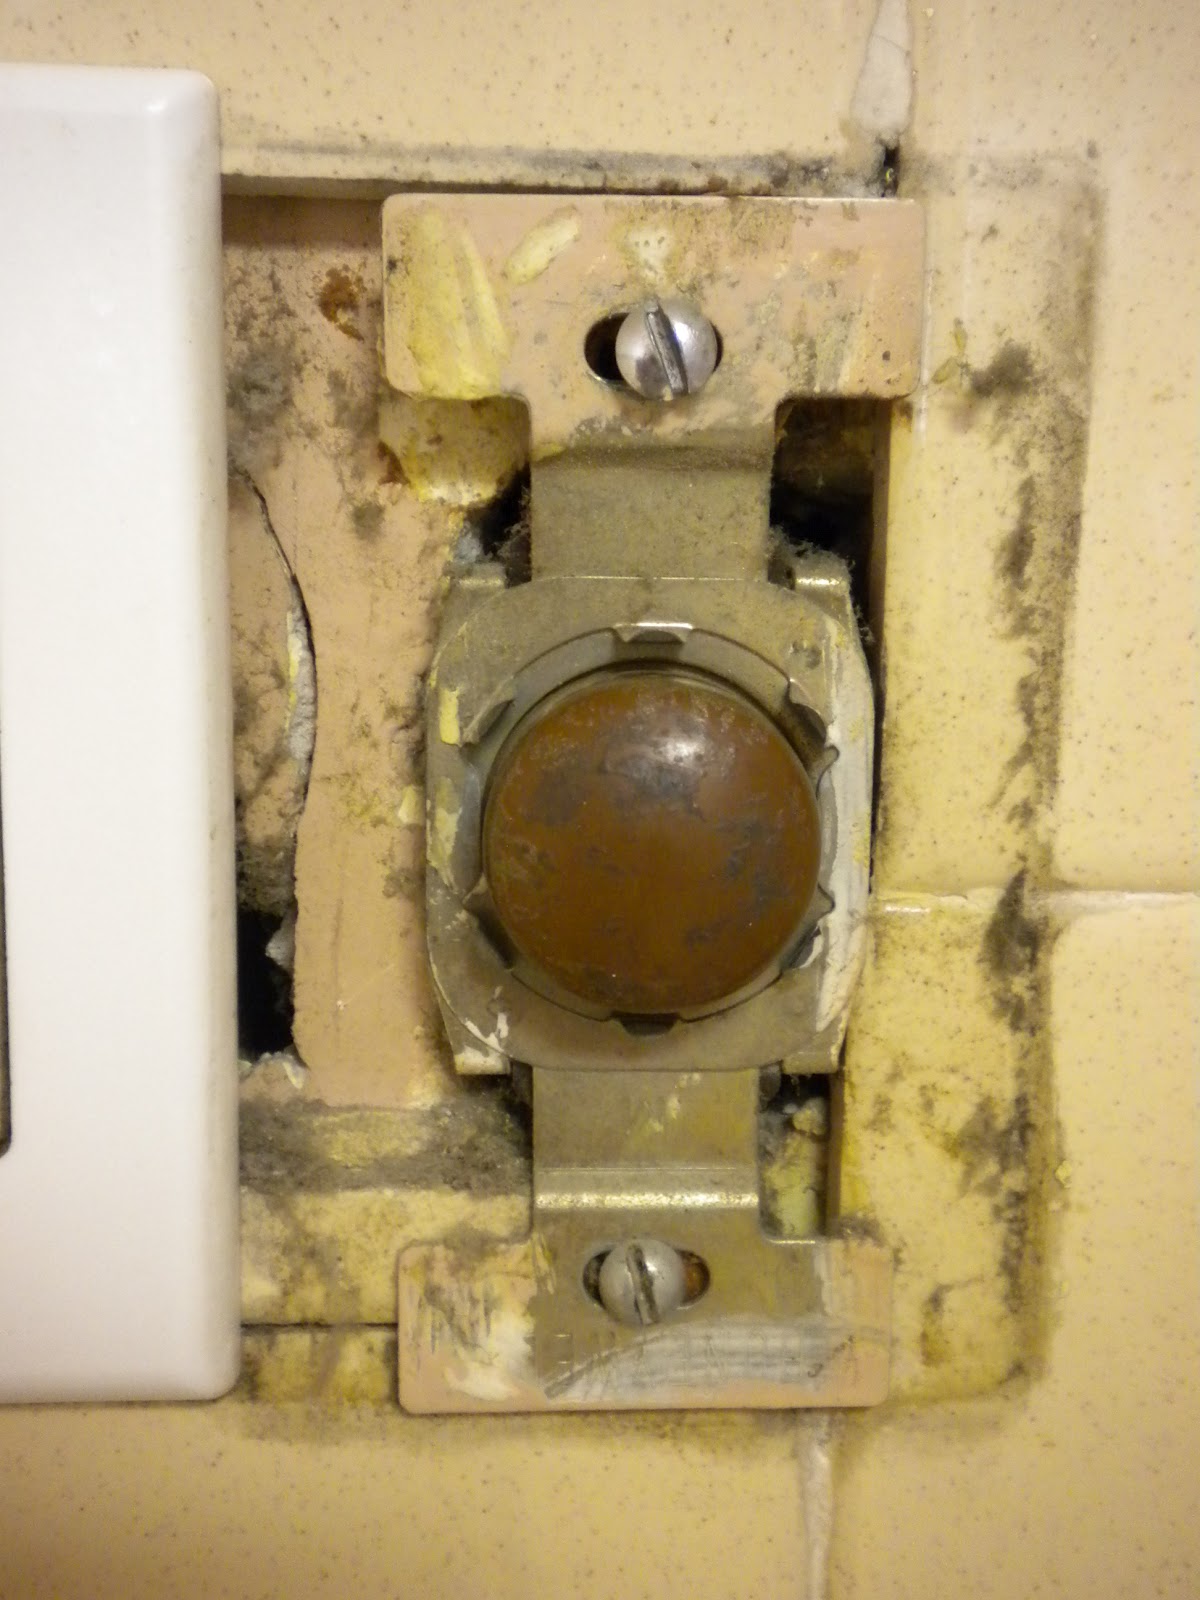 |
| The Westinghouse tap-lite switch that controls the exhaust fan is NOT in a box. For those not familiar with tap-lites, they are push-connectors only and not grounded. They are intermittent contact switches. They don't make them anymore. They are actually pretty cool, except for the safety issues. I never saw them anywhere else except for in this house. No other houses we looked at in the area had them. |
Tomorrow I plan on getting more demolition done. I will probably cut the electric to the kitchen, which is currently on two 20A circuits. One circuit is dedicated to the kitchen, so that will be easy, just turn off the breaker. The other circuit is shared with the kitchen, some outlets in the great room, some outlets in the laundry, an outside light, and the doorbell. So much for code dictating the kitchen have dedicated circuits (and also the laundry). And yet all the electric was signed off on just before we bought the house.
I don't understand why our township requires permits if they do not enforce code. I think, unfortunately, it's a wink-wink-nod-nod thing among contractors and inspectors, and the inspectors only look over the work if it's not a "professional" doing the work. That bugs me, in a way, because I would never install a switch without a box, and I sure as heck wouldn't put a washer, dryer (gas), fridge, outside light, dishwasher, and three other outlets on the same circuit! Come on, now!
Besides sorting out some electical issues, I might remove the dishwasher or the light/fan over the cooktop. Possibly rip out the top cabinets on the exterior wall. We'll see how things go.
Subscribe to:
Posts (Atom)